


Get Perfect Color in Camera with the ExpoDisc
Part 1 of a 4 Part Series on Lighting from Bry Cox.
Part of being a professional means taking control of various aspects of photography, not letting things be haphazard or fall to chance. For many years, it’s been really easy to take control of White Balance, but sadly many photographers still shoot with their camera on Auto – and then wonder why their images don’t quite look right, or why they have to spend so much time fixing each image. The solution is simple – use an ExpoDisc continually throughout a shoot.
This video shows why I use one, and also the dramatic difference before and after.
I’ve had many consultations with photographers over the years, and many spend too much time fixing color or adjusting color. They wonder why, and the first step to fixing color issues is getting things perfect in camera.
Perfect Color Starts In Camera
You need to set your color balance custom in camera. And I do this continually throughout the shoot. A little device called the ExpoDisc is an amazing product, and makes this easy. It’s small, easy to use, and should be a part of every photographer’s gear bag. I actually keep a few in my bag in case I lose one, and there is always one in my pocket to use.
To use it, simply put it over your lens, aim at your light source, and use your camera to record a new custom white balance. That's it. Because every camera brand and model are different, there are some tricks for using an ExpoDisc with each type. I share those tips in a second video at the bottom of this page.
Compare Before & After
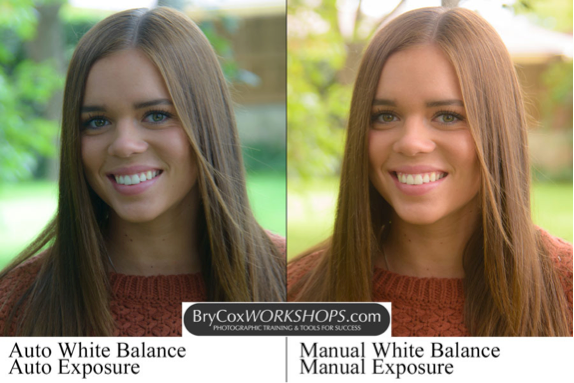
But for now, I hope you see how great everything looks when you control your color in camera. As I mention in the above video, these photos show just natural light before and after. The first image is shot with everything on Auto (auto white balance, auto exposure). The second image is with everything Manual (manual white balance, manual exposure).

Despite being a beautiful model, the first image is darker, and the skin tones are muddy, and the overall tone is greenish/blue. Why? Shade is blue compared to the sun and there’s also a lot of green grass and trees reflecting color into the skin too. None of that is good. We instead want pro results and yummy skin tones.
Rather than relying on haphazard auto settings, it’s faster and much more efficient to just shoot better images from the start. Here you can see taking a moment to stand by my subject, covering my lens with the ExpoDisc, and recording a new custom white balance. It just takes a second and the results speak for themselves.

This second image has zero retouching or adjustments. Yet look how great the color is, and how wonderful the skin tones look. Nothing is muddy, the image is vibrant, and the background and overall look of the image is warm and inviting.

For simplicity, I'm using natural light for this article, and I'm shooting in the shade for even light on the face (compared to direct sunlight). That means we have no direction to the light however which is a problem. The light is okay, but it's not great. It’s just coming in from whatever haphazard direction. So now that we've fixed our color, we’ll address light direction in the next article in this series.
And for more detail on using your ExpoDisc, here is a full article and video showing step by step and tricks for different cameras like Canon or Nikon.
And until next time, America.
Additional Blog Posts in this Series:
Part 2: Improve Natural Light Portraits
Part 3: Using Speedlights & Modifiers to Improve Your Portraits
Coming Soon:
Part 4: Creative Lighting with Gels and Flash Outdoors