Improve Your Natural Light Portraits
Part 2 of a 4 Part Series on Lighting from Bry Cox.
Continuing from our article in part 1 where we now have perfect color in camera, the next thing is to control the direction of light. Many photographers shoot portraits using Natural Light, and this approach can be absolutely beautiful when we also control light direction. Instead of using light coming in from a haphazard direction with no control, if we instead control the direction, we’ll get eyes and skin to pop. It's key to making more professional looking images.
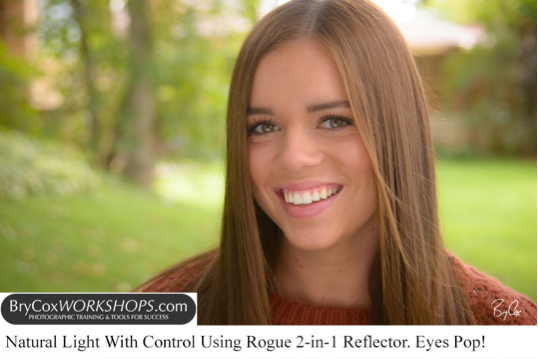
As I show in the video above in more detail, the easiest way to do this working with natural light is to have a reflector. Here I use the Rogue 2-in-1 Super Soft and Natural White reflector. I’m holding it under the eyes to add pop so that they're not dull.
Even in the shot below showing behind the scenes, the model’s eyes are dull without the reflector. That’s because the light direction is coming down on her face, creating shadows in her eyes. But with the reflector, her face glows.


Looking through my camera, notice in this first image how there is no light direction. We have dull eyes and hot spots in the wrong places. We need to fix that so that the model's eyes pop and her face is sculpted.

Holding this reflector under her face and aiming it as we show in the video, her face and eyes pop. Her skin looks great, her face is modeled and sculpted by the light, the dark areas on the skin under her eyes are gone, and their are catch lights in her eyes that make them glow.
And none of these images have had any retouching either. These are all straight images, no color or other adjustments. When we do the right things in camera, our images look better.

The Rogue 2-in-1 Super Soft Silver Reflector is great because of it’s size and finish. As I show in the video, sometimes I want the soft silver side and other times I want the white side. It all depends on the brightness of the light source and the look that I want.
Often if I’m using natural light outdoors that’s shady and already soft, I’ll use the silver side of the reflector for a bit more pop. It’s snappy enough without being too shiny. And if I’m in the studio using big soft boxes, I might use the white side for a fill and for a bit more pop in the eyes.


Above we have a studio image with no reflector fill. Below we have a reflector fill which adds more pop in the eyes.

Now that we’re nailing color and light direction, in the next video article we'll take things even further by adding flash outdoors with speedlights while controlling quality of light.
Until next time, America.
Additional Blog Posts in this Series:
Part 1: Get Perfect Color in Camera with the ExpoDisc
Part 3: Using Speedlights & Modifiers to Improve Your Portraits
Coming Soon:
Part 4: Creative Lighting with Gels and Flash Outdoors
