


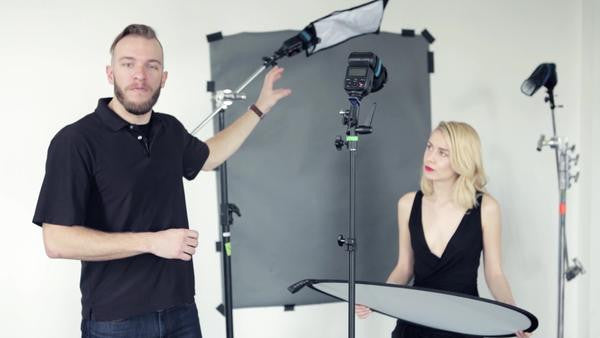
Using three speedlights, Erik Valind demonstrates how to create two very different lighting setups in the above video.
In the first setup, we'll use a Rogue FlashBender 2 XL Pro Lighting System with the Diffusion Panel attached to create the main light on our model's face. This larger light source will give us a softer light on our model's face so that no harsh shadows are created and we're not accidentally highlighting any skin imperfections or flaws.

Our main light on our model's face will (because it is off-camera) add a directional shadow to parts of her face. Shadows on her face are not necessarily a bad thing, but we want to minimize how much contrast there is between highlight and shadow in order to eliminate anything extreme and distracting. Using a Rogue 2-in-1 32" Collapsible Reflector Super Soft Silver/Natural White, we can softly fill in the shadows by positioning the reflector opposite of the main light.

Next we'll add a Rogue FlashBender 2 Large Reflector, rolled as a snoot to highlight our model's hair. This will illuminate and bring back any details in her hair that we've lost to shadows, and in addition will further separate her from the background once we finally add in a background light. Keep in mind both the FlashBender 2 Small and Large Reflector can be rolled into a snoot. The small creates a shorter snoot which will create a wider directional beam, as where the large will create a longer snoot which will create a more narrow directional beam.

Finally we'll add in a grid to illuminate the background. Grids are much different from snoots, in that they create a directional beam of light that is consistently shaped to the grid cells and results in a feathered transition from highlight to shadow. Snoots create a harder transition from highlight to shadow and will illuminate depending on the shape of the snoot.
Now there are two options when using a Rogue 3-in-1 Grid! One option is to use the standard and included black grid inserts which will create a circular spot light with a feathered transitional edge. The other and newer option is to use the Rogue White Grid Inserts (purchased separately) to create the same circular spot light with a feathered transitional edge that has a ethereal and angelic halo around that edge for a bit more spread.

For the second three-light setup, we'll swap our model's attire for something a little more formal and reminiscent of the early Hollywood days of glamour. First we're going to swap the background light (Rogue 3-in-1 Grid with White Grid Inserts) and the main light (Rogue XL Pro Lighting System with Diffusion Panel attached). Instead of illuminating the background, we'll turn our flash with the XL Pro attached towards our models hair so that she has more light falling on the top of her head, further separating her from the background, which has now fallen into complete shadow. Our Rogue 3-in-1 Grid with the White Grid Inserts will illuminate our subject's face with a harder light, given that old film noir look to her portrait and complete the image.

Final Images:

 '
'